Payment traces
- If a beneficiary claims to not received the funds, you can request to trace the payment's status.
- Previously, trace requests were sent to Client Services, who then initiated the trace process.
- With this new feature, you can initiate a trace request directly through the Client Portal or API.
- The trace process involves checking each step of the payment flow to identify any issues that might be delaying the payment.
- This page explains how to initiate a payment trace through our Client Portal and check the status of the trace
Initiate a payment trace through the Client Portal
Before you start, ensure that you have been assigned the 'Initiate payment recall and traces' permission by your admin user. You can initiate a trace from the list of payments.
Note that a trace process can only be initiated for:
- External Outgoing payments
- Payments with Status "Processed"
- Payments that are less than 6 months old
Traces cannot be initiated for:
- SEPA Instant or Faster Payments
- Internal payments or own payments
- A payment, for which a trace is in:
- In progress
- Trace status is "Successful/completed"
- A payment, for which a recall is in:
- In progress
- Recall status is "Successful"\
If you try to initiate a trace on payments that are not eligible, a message will appear explaining why the trace cannot be processed. If you’re unsure, please refer to the trace criteria above. Two example messages below (Fig. 1)

Fig. 1 Payment is not eligible
Initiating a trace from the list of Payments:
- Identify a payment to trace (fig. 2)
- Click on the three-dots at the end of the row for the payment you'd like to trace
- In the menu that pops up, click “Initiate trace”
- Double check the payment details, and submit it by pressing “Initiate trace” (Fig. 3, below left)
- Once confirmed, a success message appears (Fig. 3, below right).
- The trace will now appear in the Trace section

Fig. 2 - Initiate trace from the list of Payments

Fig. 3 – Confirm payment trace details and success message
Checking the status of a trace
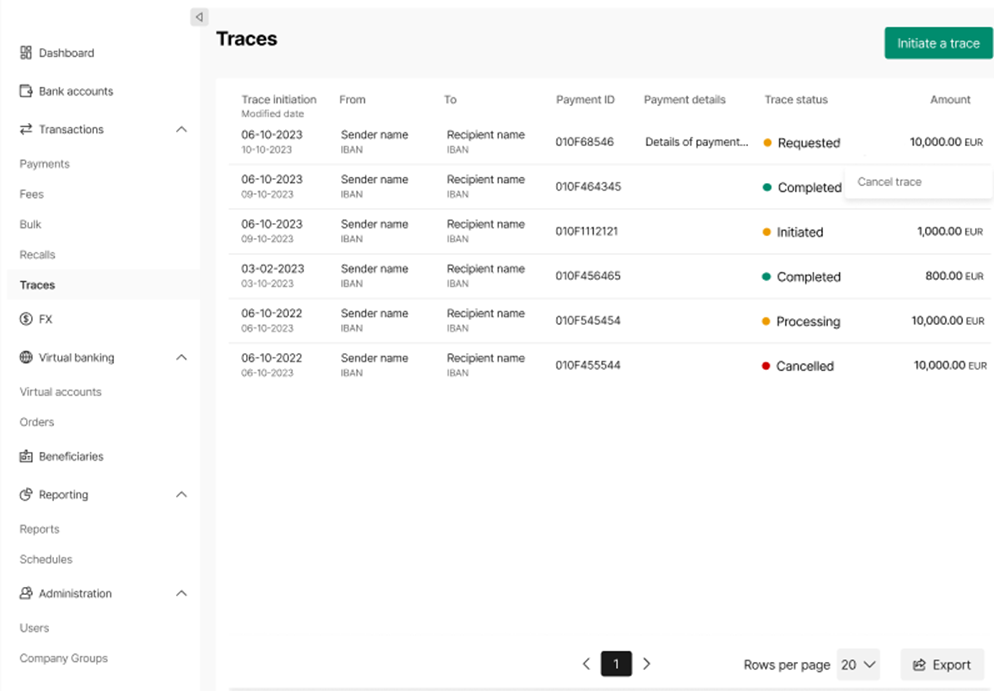
Once you have requested a trace, the request will appear in the Traces section, alongside any other trace requests made in the last 6 months.
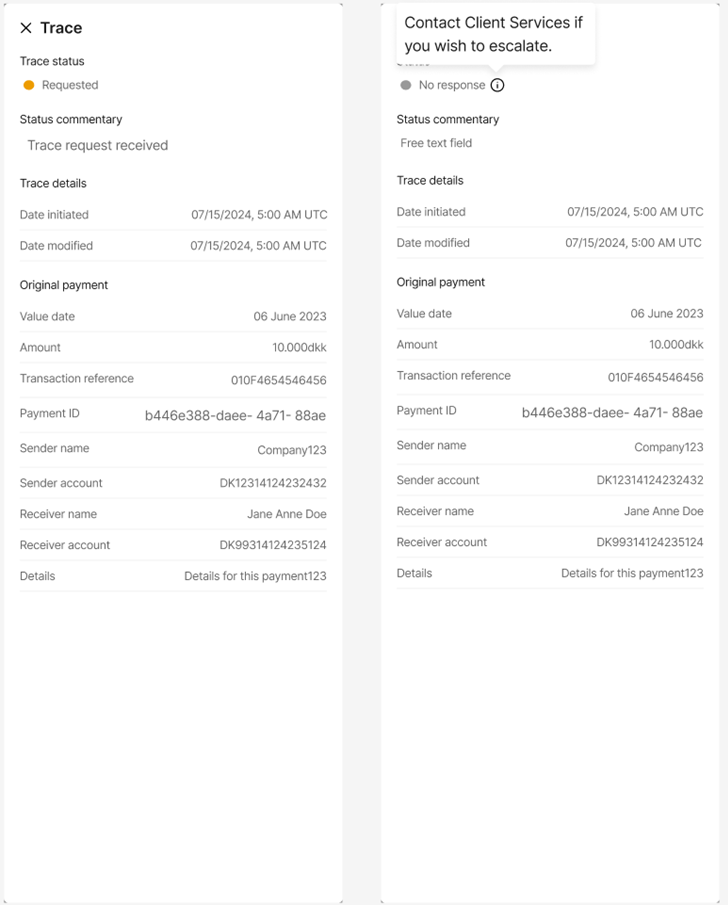
Clicking on the row will show you details about the trace (Fig. 4 below):
- Information about the trace request: the status of the trace, when it was initiated, last modified and the latest update available in the Status commentary
- Details of the payment
We will make up to three attempts to trace the payment. This includes the initial trace request and two follow-up chasers, spaced five working days apart, if no response is received. If the third attempt is unsuccessful, we recommend you contact the receiver to check with their bank directly.

Fig. 4 - Trace details
Cancelling a trace
From the list of Traces:
- Identify a payment trace to cancel (fig. 5)
- Click on the three-dots at the end of the row for the payment trace you'd like to cancel
- In the menu that pops up, click 'Cancel trace'
- You will then be prompted to confirm the cancel request. Once confirmed, a success message appears (Fig. 6).
- The trace will now appear as “Cancelled” in the Trace section

Fig 5. Traces section and cancelling a trace

Fig 6. Cancelling a trace confirmation message
Updated 16 days ago
