Manage your team
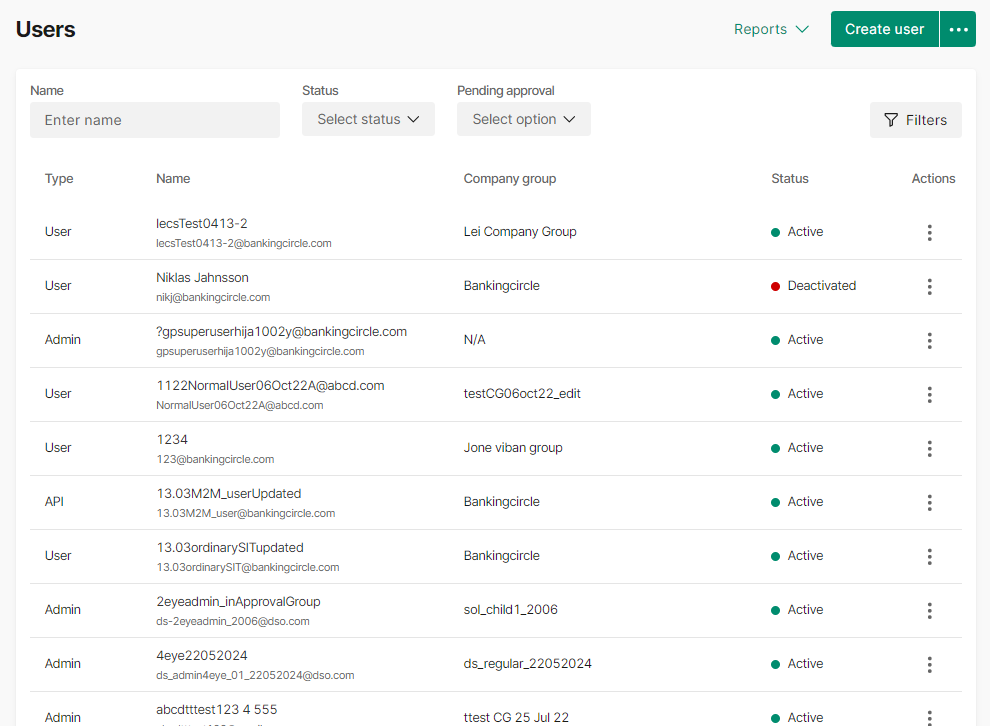
As an Admin User, you can create and update users via our Client Portal.


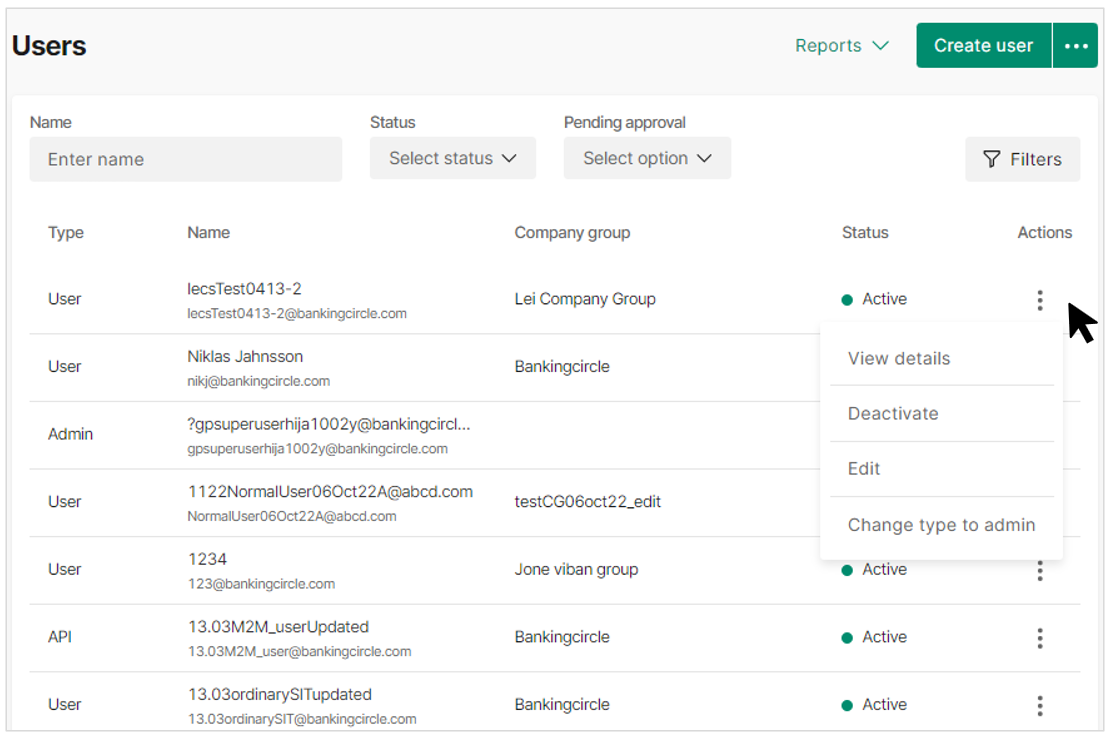
Fig1. Three dots menu options
Types of users
There are three different User types on BC Connect: Regular users, Admin users and API users.
Regular user
Accesses the Client Portal for tasks like initiating payments, downloading reports, and checking account balances. Access and privileges depend on assigned bank accounts and permissions.
Admin user
Accesses the Client Portal to manage users by assigning permissions, and granting bank account access.
An Admin can operate with and without Approval from another Admin User.
- With Approval: Requires another Admin user's approval for user administration actions. The Admin user has rights to create and approve users. At least two Admin Users are required for this setup to work.
- Without Approval: No approval needed for user administration actions. One Admin User is required for this setup to work.
Admin users will get access to all accounts within the company group.
Next to an Admin user’s user management privileges, it is also an option to grant access to additional permissions such as initiating and approving payments. We recommend not allowing Admin users to initiate and approve payments to minimize risk of collusion.
Admin users cannot create new API users or make changes to certificates used by API users. If you wish to create an API user or make changes to a certificate, you must also reach out to us.
Admin users can also not create or update other Admin users. If you wish to create or update an Admin user, you must reach out to us. Download and fill out the Admin user form and send it to Client Services.
API user
Is a machine-to-machine user that interacts with BC Connect via APIs. Access and privileges depend on assigned bank accounts and permissions.
Create a new user
Admin users can create Regular users. If you need to create an Admin or an API user, you need to reach out to us.
Users can only be part of one company group. Users will have the same permissions and payment rules for all accounts, e.g. if the user has the permission to initiate payments, the user will be able to initiate payments on all bank accounts that the user has access to.
- Go to Administration -> Users
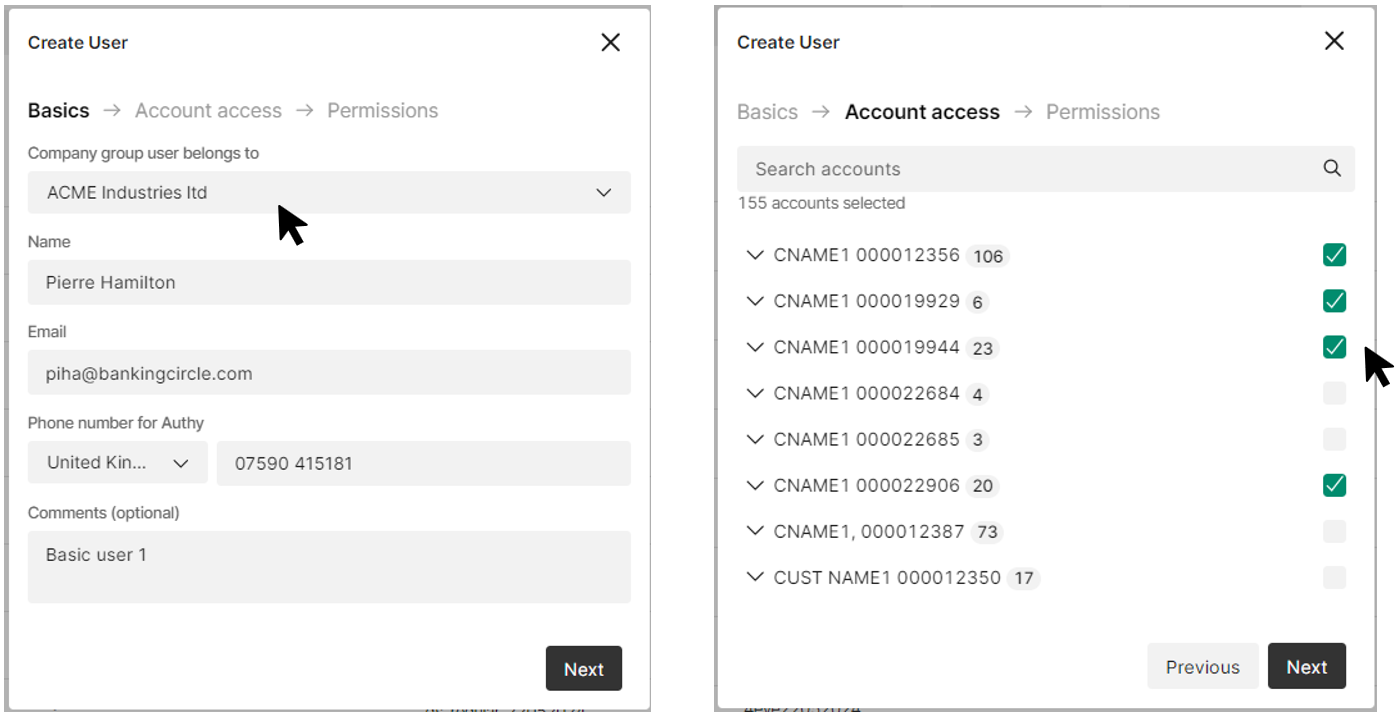
- Click New user, and follow the steps:
- Basics: Enter name, phone number, and email
- Phone number must belong to the user that is being created because it is used for Strong Customer Authentication via the Twilio Authy app
- Basics: Enter name, phone number, and email
- Account access: Select Company(ies) and Bank accounts to grant access
- Permissions: Assign permissions
- If 'Initiate payments permission’ is granted, you must also decide if payments initiated by this user will need an approval from another user with the Approver permission before the payment is submitted. Users will have the same permissions and payment rules for all bank accounts
- Click Create
- Depending on your set up
- Authenticate yourself via the Authy app, or
- Get approval by another Admin
- If the creation requires approval, an (i) appears on the user until approved.

Fig. Step 1 to create a new user

Fig. Steps 2 and 3 to create a new user

Fig. Steps 4 and 5 to create a new user
Note, it may take up to 60 minutes before the changes take effect.
View and Update a user
Admin users can update Regular user and API users. Any updates to Admin users can only be done by us.
- Go to Administration -> Users
- Click on the user to update
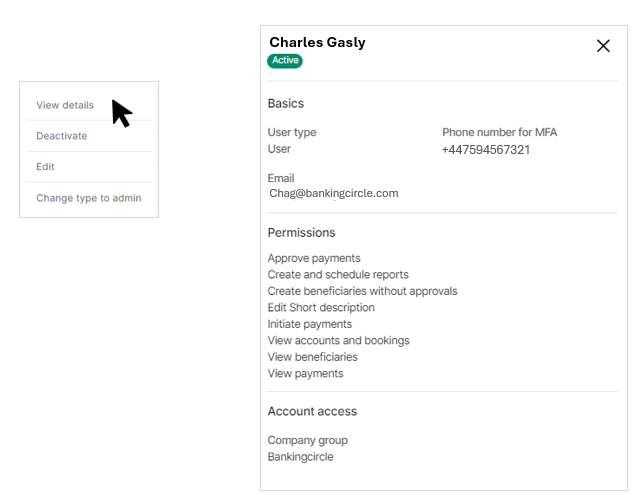
- Click View details or Edit
- Edit Basics, Account access, and Permissions
- Click Save
- Depending on your set up
- Authenticate yourself via the Authy app, or
- Get approval by another Admin
- If the creation requires approval, an (i) appears on the user until approved.
Note, it may take up to 60 minutes before the changes are effective.


Fig. User details
Deactivate/reactivate users
Admin users can only de- and reactivate Regular users. Any de- or reactivation of API or Admin users can only be done by us.
- Go to Administration -> Users
- Click on the user to update
- Click Deactivate or Reactivate
- Depending on your set up
- Authenticate yourself via the Authy app, or
- Get approval by another Admin
Note, it may take up to 60 minutes before the changes are effective.

Fig. Confirm before user deactivation
Assigning new bank accounts
When opening a new bank account with BC Connect, Admin users must manually assign the account to relevant Regular and API users.
Note: Don't forget to assign new accounts to all relevant Regular and API users!
Updated 3 months ago
