Approval Groups and Limits
The Approval Groups and Limits feature empowers your organisation to manage payment approvals with precision, transparency, and robust financial control. By combining flexible user group management with configurable approval thresholds, this feature ensures that every payment is reviewed and authorised according to your internal governance standards. With this feature, you can:
- Create and maintain Approval Groups by assigning users who have approve permissions to groups responsible for approving payments.
- Configure Approval Limits by defining payment amount ranges, specifying the number of approvals required, and selecting which groups or group combinations are responsible for each range.
- Apply and manage Approval Configurations at the account level, ensuring all accounts have the appropriate governance and that any gaps, such as insufficient approvers or missing configurations, are clearly flagged for follow-up.
This guide walks you through how to create, edit, and manage Approval Groups and Approval Configurations, as well as how to monitor and update account-level approval settings for robust payment governance across your organisation.
Benefits
- Enhanced security & fraud prevention: multi-level approvals reduce the risk of errors and internal fraud by ensuring that no single individual can authorise high-value payments alone. This maker-checker approach adds a critical layer of oversight and protects your business from operational risks and internal fraud attempts.
- Customisable controls: you can tailor approval workflows, groups setup, and amount thresholds to match your business needs and risk appetite. This flexibility supports both simple and complex organisational structures.
- Improved efficiency & transparency: automated approval workflows streamline the payment process, reducing manual effort and ensuring payments are processed on time. Real-time visibility into approval status enables proactive payments management.
- Scalability: as your organisation or payment needs grow, the feature scales effortlessly, supporting more users, accounts, and increasingly complex approval hierarchies without sacrificing control or oversight.
Access Requirements
- To access and manage Approval Groups or Approval Configurations, you must have User Administrator permissions.
- Dual approvals: Creating and editing requires two approvals before being applied.
- Single approval: Creating and editing requires Multi-Factor Authentication (MFA) before being applied.
- When you save your changes, you will be prompted to approve the action using the Twilio Authy app. Simply open Authy on your device and confirm the request to complete the process.
Creating new users with approval permissions
Note: When a new user with approval permissions is created, they must be assigned to the appropriate approval group. Without this, they will not be able to approve payments.
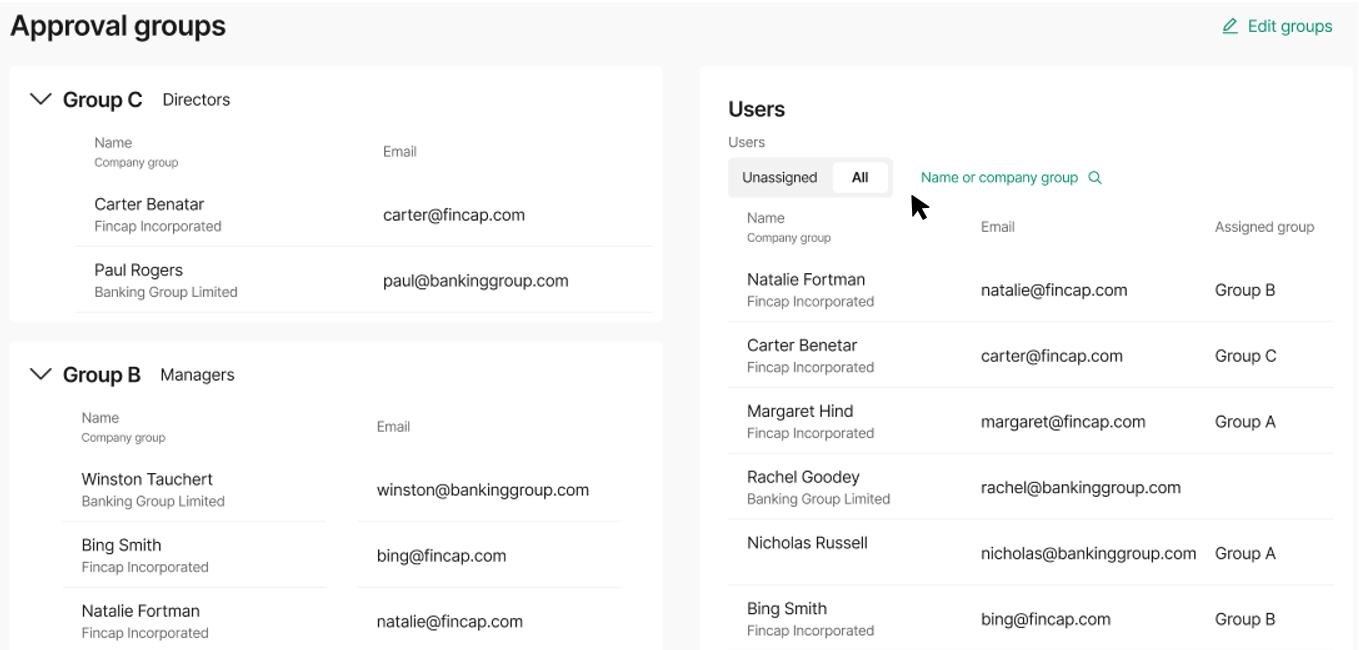
What are Approval Groups?
Approval Groups are collections of users who have permission to initiate and/or approve payments. These groups streamline the approval process and ensure compliance with your organisation’s governance and risk policies.
Creating an Approval Group
Follow these steps to create and manage Approval Groups,
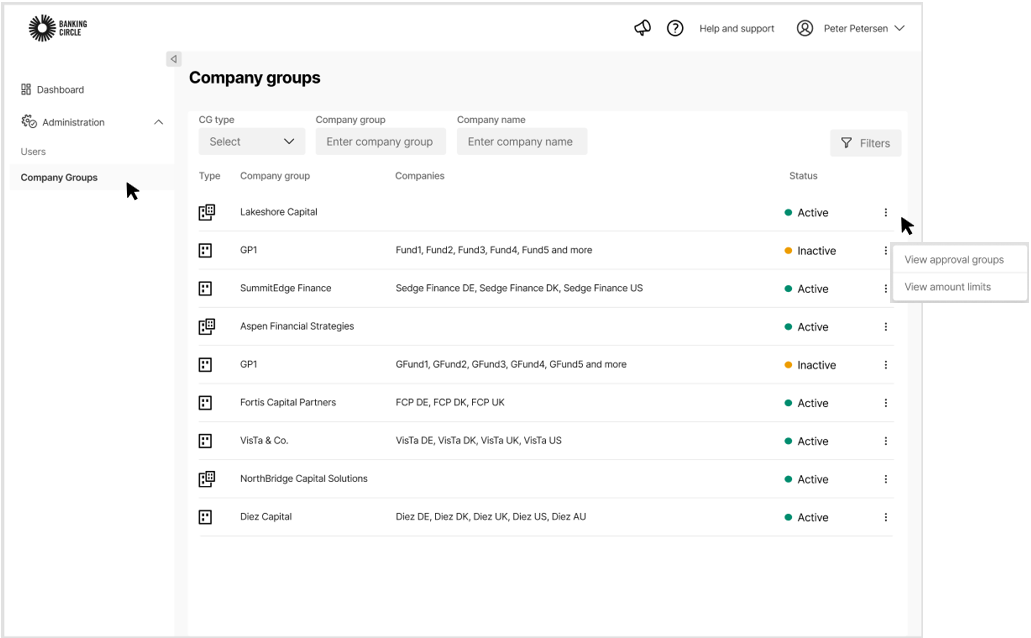
Step 1: Log in and navigate to Company groups
- As a User Admin, log in to the Client portal.
- Navigate to the Administration section
- Navigate to Company Groups if you are a Fund Administrator. Go to Approval Groups otherwise
- Identify the company group whose configuration you want to view
- Click on the three-dot menu next to the group and click on View approval groups.
Log in and navigate to Company Groups
Step 2: Create or Edit Approval Groups
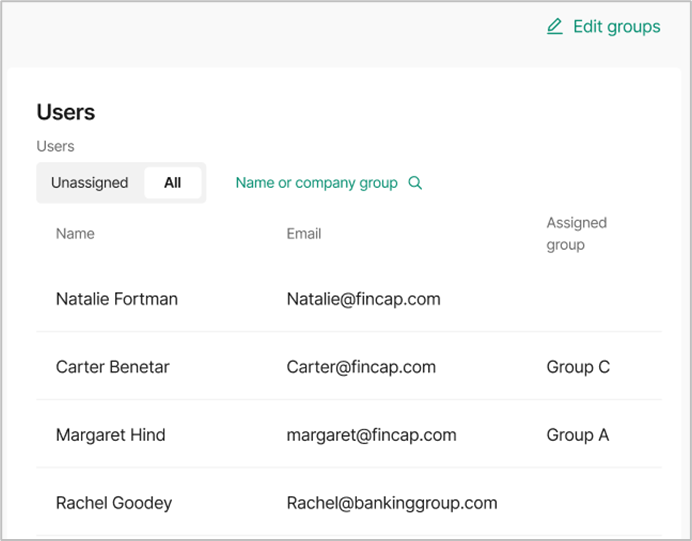
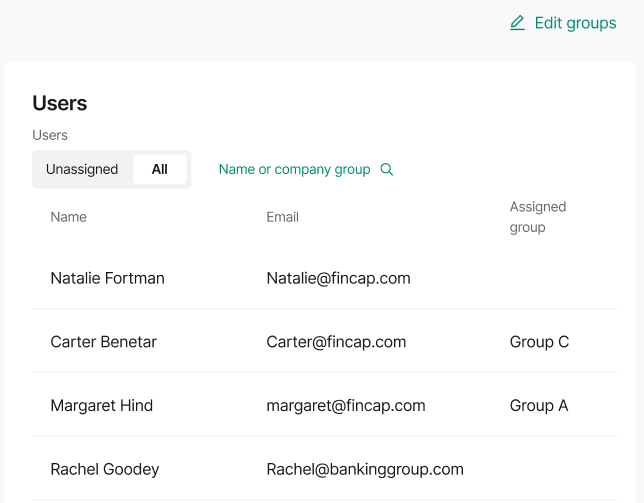
- Click "Edit groups" Begin by selecting the Edit groups option at the top of the Approval Groups screen. This allows you to modify existing groups or create new ones.
- Add a new group by clicking on the “+ Add groups” option
Note: An approval group must have at least one user.
Edit Approval Groups
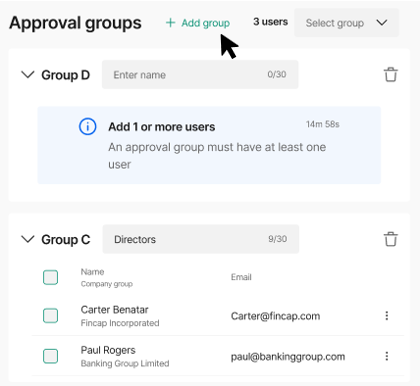
Add group
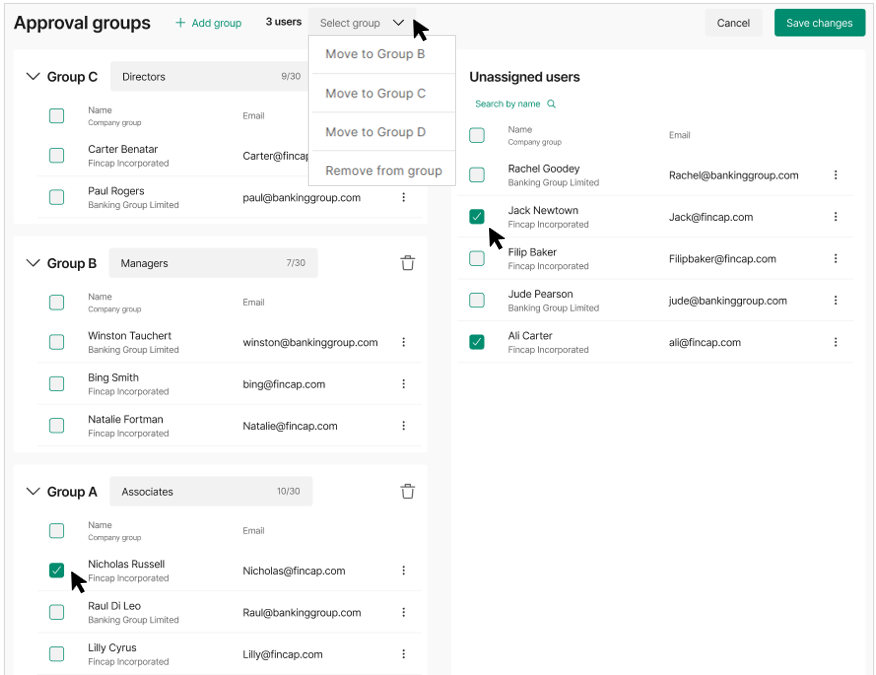
Step 3: Select users and save changes
- Select Unassigned users - tick the checkbox next to each user you want to add to an Approval Group.
- Choose the target group - use the dropdown menu labelled Select group to pick the group you want to assign the selected users to.
- Click "Apply" - after selecting the users and the target group, click the Apply button to assign the users to the chosen group.
- Save Changes - once you have assigned users to groups, click Save changes to confirm and update the Approval Groups.
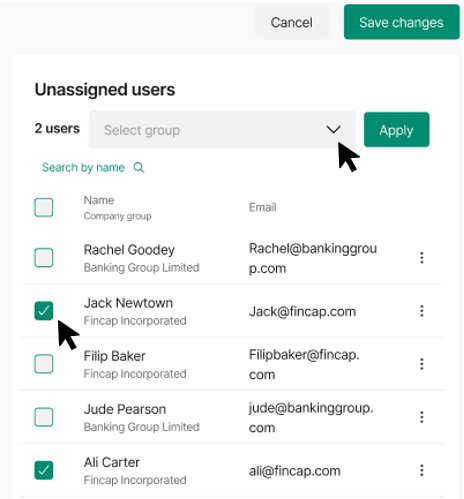
Select users and save changes
Your Approval Group is now updated with the selected users. Repeat these steps to add or reassign users as needed.
Editing Approval Groups
- As a User Admin, log in to the Client portal.
- Navigate to the Administration section.
- Navigate to Company Groups if you are a Fund Administrator. Go to Approval Groups otherwise.
- Identify the company group whose Configuration you want to view .
- Click on the three-dot menu next to the group and click on View approval groups.
- Click on Edit groups.
Note: If there is a pending Approval Group edit that has not yet been approved, you will be editing that version. When you submit your changes, you will also take ownership of any previous, unapproved changes. This means your submission will include both your new updates and any earlier pending edits.
You can select multiple users to move them to a different group or remove them from a group as needed.
Alternatively, to manage an individual user, click on the three-dot menu next to their name and select the desired action.
Confirm your selection and click on Apply

After clicking Apply, make sure to save your changes to finalise the updates.

Note: A new Approval Group, or any changes to an existing one, must be approved by a second User Administrator before taking effect, unless you have Single Approval permissions, which allow you to create and edit without further approval.
Users not assigned to a group will be listed in the Unassigned section on the Approval Groups page.
Creating an Approval Configuration
The Approval Configuration feature uses a three-step wizard to help you define payment approval rules and assign Approval Groups based on payment amount ranges. Follow these steps to create a new Approval Configuration for your organisation.
Note that to create an Approval Configuration, at least one Approval Group is required.
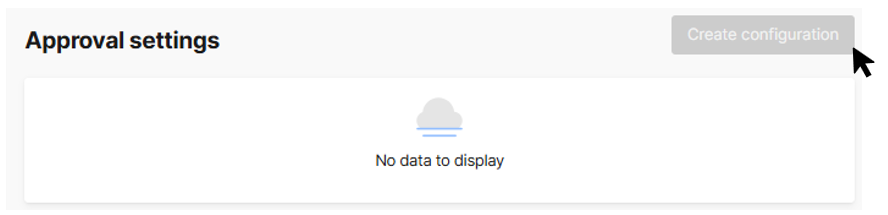
Step 1: Login and go to Approval settings
- As a User Admin, log in to the Client portal.
- Navigate to the Administration section.
- Navigate to Company Groups if you are an Administrator. Go to Approval Settings otherwise
- Identify the company group whose Configuration you want to view.
- Click on the three-dot menu next to the group and click on View approval settings.
- Click on Create configuration.
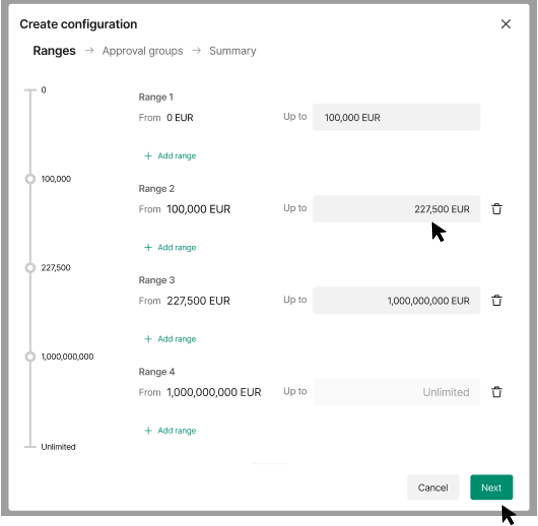
Step 2: Define Amount Ranges
- In the Ranges step, set the payment amount ranges that will determine which approval rules apply.
- For each range:
- Specify the starting amount (From) and the upper limit (Up to) - note that all amounts are in EUR.
- Click + Add range to create additional ranges as needed.
- You can remove a range by clicking the trash icon to the right of the field.
- Example:
- Range 1: 0 EUR – 100,000 EUR
- Range 2: 100,000 EUR – 227,500 EUR
- Range 3: 227,500 EUR – 1,000,000,000 EUR
- Range 4: 1,000,000,000 EUR – Unlimited
Once your ranges are set, click Next.
Step 3: Assign Approval Groups
- In the Approval Groups step, configure the approval requirements for each amount range.
- For each range:
- Select the required Number of approvals from the dropdown.
- Tick the checkboxes to assign one or more Approval Groups that can approve payments within that range (minimum of one Approval Group option must be selected per range).
- You can select multiple groups for each range to match your organisation’s governance needs.
- Example:
- For payments up to 100,000 EUR, require 1 approval from groups A, B, C, D, E, or F.
- For higher ranges, you can require more approvals and/or more groups.
- When finished, click Next.

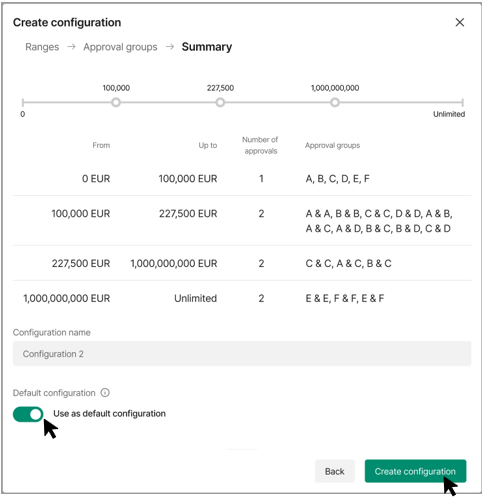
Step 4: Review and Confirm
- In the Summary step, review your configuration:
- See a breakdown of each amount range, the number of approvals required, and the assigned Approval Groups.
- Enter a name for the configuration.
- (Optional) Toggle Use as default configuration if you want this to be the default for your organisation.
- Important: A default configuration is the approval setup that is automatically applied to new or unassigned accounts within your organisation.
- If everything is correct, click Create configuration to finalise
Note: A new Approval Configuration, or any changes to an existing one, must be approved by a second User Administrator before taking effect, unless you have Single Approval permissions, which allow you to create and edit without further approval.
- You can edit or delete configurations later if your approval policies change.
- Note: If there is a pending Approval Group edit that has not yet been approved, you will be editing that version. When you submit your changes, you will also take ownership of any previous, unapproved changes. This means your submission will include both your new updates and any earlier pending edits.
- Note: If there are pending Company Group edits, you will not be able to edit an Approval Configuration until such Company Group edits are approved.
- Use clear and descriptive names for configurations to help administrators identify them easily.
By following these steps, you ensure that payment approvals in your organisation are governed by clear, auditable rules tailored to your needs.
Amount Limits approval settings
The Amount Limits section provides a clear overview of your organisation’s payment Approval Configuration, including amount ranges, required approvers, and assigned Approval Groups.
Login and go to Approval settings
- As a User Admin, log in to the Client portal.
- Navigate to the Administration section.
- Navigate to Company Groups if you are an Administrator. Go to Approval Settings otherwise.
- Identify the company group whose Configuration you want to view .
- Click on the three-dot menu next to the group and click on View approval settings.
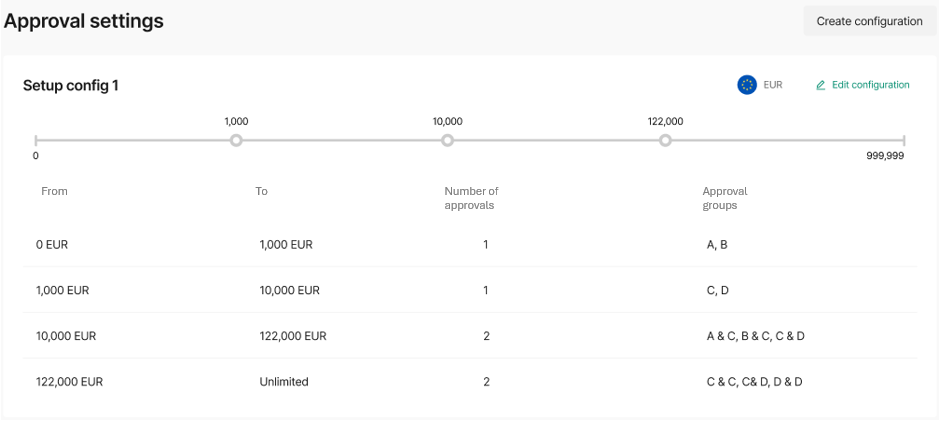
Understanding the Amount Limits Approvals Section
Once inside the Amount Limits approvals section, you will see a summary table and a visual range selector:
- Amount ranges: The table displays each payment amount range (e.g., “0 EUR – 1,000 EUR”, “1,000 EUR – 10,000 EUR”, etc.).
- Number of approvals: For each range, you’ll see how many separate approvals are required before a payment can be processed.
- Approval Groups: The assigned Approval Groups for each amount range are listed, showing which groups are responsible for approving payments within that range.
You can easily update a configuration by clicking on the Edit configuration button in the top right corner of that configuration
Approval Settings and Limits
Understanding the Accounts Feature
The Accounts section provides a consolidated view of all accounts within your selected company group, highlighting their current approval setup and identifying any issues that require attention.
- Account list: Each row represents an account, displaying the account name, number, and a short description if available.
- Approval status: Accounts with issues are flagged with warning icons and tooltips. For example:
- “Not enough users to approve” indicates the account does not have the minimum number of approvers assigned, which may prevent payments from being approved.
- “No Approval configuration has been set up for this account” highlights accounts that lack any Approval Configuration, meaning payment approvals are not governed for these accounts.
- Approver counts: Columns such as “Group A approvers” show the number of users assigned as approvers from each group who have access to the account. If the number is insufficient, a warning icon appears to prompt corrective action.
- Approval Configuration: The “Approval config” column displays which Approval Configuration is currently applied to each account (e.g., “Setup Regular Config 1” or “Setup Config 2”).
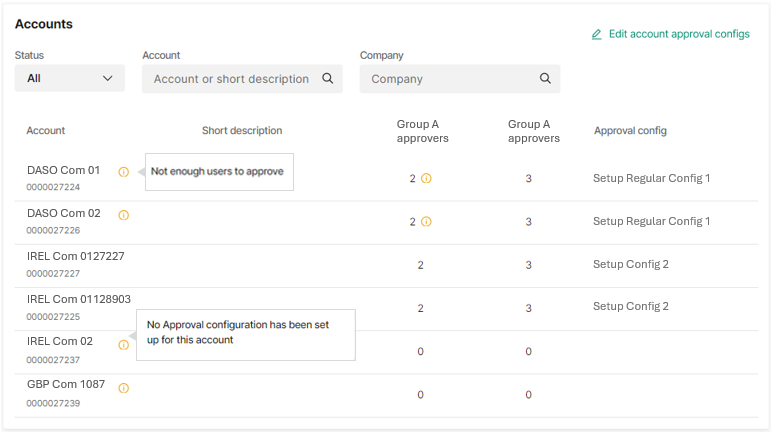
You can easily update which Approval Configuration is applied to each account using the Edit account approval configs button in the Accounts section.
- At the top right of the Accounts table, click Edit account approval configs.
- For each selected account, you can assign an existing Approval Configuration from the available options in the dropdown menu.
- Once you have selected the required configuration for each account, save your changes to apply the new approval rules.
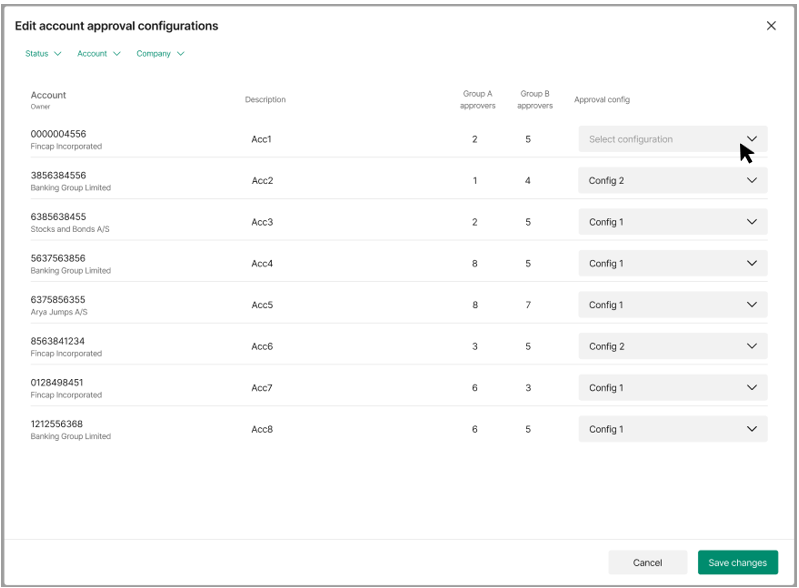
Select Configuration and Save changes
Note: A new Account Approval Configurations, or any changes to an existing one, must be approved by a second User Administrator before taking effect, unless you have Single Approval permissions, which allow you to create and edit without further approval.
Best Practices
- Regularly check the Amount Limits approvals section to ensure all payment ranges have the correct number of approvers and that all accounts are covered by a configuration.
- If you identify accounts without sufficient approvers or missing configurations, update the Approval Groups or Approval Configurations as needed.
By following these steps, you can efficiently monitor and manage your organisation’s payment approval structure, ensuring compliance and reducing risk.